
24 Dec. 20
How to Replace The Kitchen Sink
Replacing the kitchen sink is really straightforward, but also this is a time-consuming job. There are sinks with all the sizes, shapes and materials, where some of it is trickier to perform with than the others.
How long will it take to change the kitchen sink?
On the average, for the standard kitchen sink, it will take the professional installer between 2h and 1,5h. However, there are some factors that came into play together with this task in your hand. An example is how easily an old sink is being taken out, whether the pipes needed to be changed as well and how much work that they needed on the hole.
How to take out the kitchen sink?
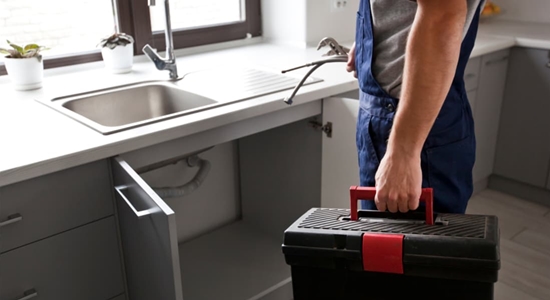
The primary step to replace the kitchen sink is just to take out the old one. The task needs to be controlled gingerly, so that you will not damage a new sink or a countertop. If you are not 100% sure with your DIY plumbing knowledge, it is advised that you call the professional plumbing service giver and let them change your sink.
Tip: Before disconnecting the pipes under your sink, take a picture, so you will have it simpler when you install a new unit.
Equipment and other tools you will need:
- A bucket and old towel
- Adjustable wrench
- Pliers
- Stanley knife or the like
- Screwdriver
STEP 1 – Turn off your water and disconnect your supply lines
In removing the kitchen sink, initially, stop both the hot and the cold water supply to your sink. Then use an adjustable wrench in disconnecting the drain pipe and the supply lines which are connected to the drainage system of the house.
STEP 2 – Drain your remaining water and then situate the bucket under the sink.
It is likely that sum total of water can be left within the pipes, and so drained them really well. Place the bucket under your sink and allow the water to run. When there is nothing left, switch off the tap, then take out the bucket.
STEP 3 – Detach the garbage disposal item and the dishwasher.
When you have the garbage disposal beneath the sink and the dishwasher, disconnect them too. If you have the water filtration system, cut off it from a tap, too, in doing so for either of the appliances, you will then want to check the instructions first.
Tip: When you are separating any kind of appliance, keep the bucket and the rag nearby since there can be leaks.
STEP 4 – Disconnect the p-trap pipes and the drain pipe
When you have not done this already, then, today is the time. Disengage the drain pipe and the p-trap pipe from underneath your sink. Also, be to take out any other parts of the kitchen sink before going on with the changing of your kitchen sink.
STEP 5 – Unscrew its metal clips and then cut the caulk
You need to unscrew its metal clips. They’re situated under the sink for mutually under-mount and top sinks. After you take out the clips, you have to cut a caulk. The variation in between the 2 kinds of sinks is the location of the caulk. For the under-mount sinks, it is situated under the sink where its metal clips are, wherein, for the top-mounted sinks, it is over the top where the broader part of a sink met the counter.
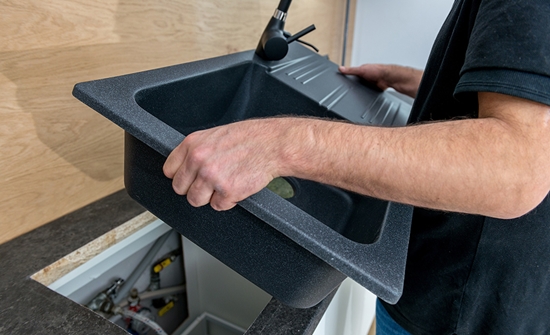
STEP 6 – Take out an old sink and then scrape off with any caulk
If you are finished with the cutting of caulk, remove a sink and then scrape off that remaining caulking and cleaning of the worktop.